Add Storage
Compatible Storage Drives
Almost all types of storage mediums are compatible with the FxBlox. The Blox has internal slots for:
- Framework Storage Expansion Cards
- MicroSD
- M.2 NVMe
- And any internal/external drives via USB-C (or USB-C adaptor)
For the Blox to recognize and use the drive as storage, it must be formatted to ext4. This is automatically done for all drives connected to the Blox during the setup. If you want to add more storage after the fact, then you will have to manually partition and format it.
Install Internal Storage
To install an NVMe or MicroSD drive, you'll have to open the Blox to gain access to the Single Board Computer (SBC) inside.
- Remove the four black screws of the 3-port USB-C housing.
- Remove the four silver screws on the bottom of the Blox.
- Slowly slide out the SBC.
- Remove light orange cover on the nvme screw mounting point.
Install M.2 NVMe drive
With nvme drives, there are a lot of options to choose from. Which ever you choose, M.2 NVMe drives are plenty fast enough to maintain a quality speed for reads, writes, and data transfers.
To install your first NVMe drive:
- Follow steps above to open the case.
- Insert NVMe drive into M.2 slot at an angle. Make sure no pins are showing.
- Hold drive down, while you screw it into place. (Screw not included with FxBlox)
- Follow steps in reverse order to put the case back together.
Install MicroSD Card
MicroSD cards have comparatively slow read & write speeds. We don't have enough data to recommend them as a method of storage for Fula net, but it should still be possible to run a high-speed, high-capacity card. The port is located under the wifi card. To access it:
- Follow steps above to open the case.
- Wifi card does not need to be removed to insert microSD card. Insert microSD card from the side of the board.
- Follow steps in reverse order to put the case back together.
Install External Storage
You can use any type of drive as long as it can be connected via USB-C cable or adapter. Plug it in to any of the three USB-C ports available on the side of the FxBlox. These include, but not limited to:
- SATA drives (2.5-inch internal SSDs or 3.5-inch internal HDDs)
- External SSD's or HDDs
- External NVMe drives
- Docking stations
- Hardware RAID arrays
- etc...
Manually Partition and Format
If you want to add additional storage at some point after initial setup. You will need to manually partition and format the drive before it can be used by the FxBlox.
You will need to partition 100% of the drive and format to ext4. To do this on Mac and Linux, you will want to be comfortable with the command line. Windows will require a third party tool.
Linux (Terminal) (Recommended)
You do not need a separate Linux computer to do this. Although the drive can not be seen in the FxBlox app yet, we can manually format it through the Blox's desktop interface.
At this point, your Blox must already have an internet connection, if not please complete the setting up your FxBlox first. If completing set is not an option, you can connect an ethernet cable via usb-c. This will allow you to remotely login from another computer with ssh. Checkout this article, made by a community member, for more information on how to do that.
Alternatively, you can connect keyboard, video, & mouse. Bottom port is DisplayPort and HDMI compatible on both the CM4 and RK1.
Video Guide
Written Guide
- Connect your drive to the FxBlox
- Connect to your FxBlox via
sshor keyboard, video, & mouse- If you have FxBlox Lite (CM4):
ssh pi@fulatower, passwordraspberry
- If you have FxBlox Lite Plus (RK1):
ssh pi@fxblox-rk1, passwordfxblox
- When connecting directly, open up Terminal app with
Ctrl + Alt + T
- If you have FxBlox Lite (CM4):
- Update current packages with
sudo apt update && sudo apt upgrade. Enter your password. :::If it asks to choose between files If it asks to choose (y/n) between two file versions, entern. ::: - Download
partedapp withsudo apt install parted - Identify new disk(s) with
lsblk. External drives will show up assdX. Internal drives would show up as the type of device.
info
In the following commands, replace sdx with the device name(s) found in the output of the above command. Repeat steps 10-12 for any new drives you have, one at a time.
- Assign your drive the
GPTpartition standard withsudo parted /dev/sdx mklabel gpt - Partition your drive with
sudo parted -a opt /dev/sdx mkpart primary ext4 0% 100% - Format the newly created partition with
sudo mkfs.ext4 /dev/sdx1 - Wait for it to complete. Then restart FxBlox app.
- You should now see that your total maximum storage has increased by the size of the drive you installed. You may also need to hit the refresh button.
If you have any issues, checkout the Troubleshoot section for more information.
MacOS (Terminal)
Ext4 is a linux standard that MacOS does not support without some third-party help. You will not be able to use the Disk Utility app on Mac, to partition to Ext4. We do not need to mount our drive to Mac, we just need to partition and format it. To do so:
Video Guide
Written Guide
- Start by downloading the fdisk command-line tool on sourceforge
- Install app by double-clicking on the downloaded dpkg file
- You will not be able to open it, because of Apple security measures. To circumvent them, open
Settings->Privacy & Security->Security - Click on
Allow Anyways - Connect drive to Mac, if not already done. Click
Allowto allow access to drive and now clickIgnoreto keep it discoverable - Open up your Terminal app by searching your Applications or search with Spotlight by pressing
CMD+SPACEBAR, then typeTerminal - Identify disk location with
diskutil list. You'll want to keep note of the path, it should be something like/dev/disk# - Now start command-line utility with
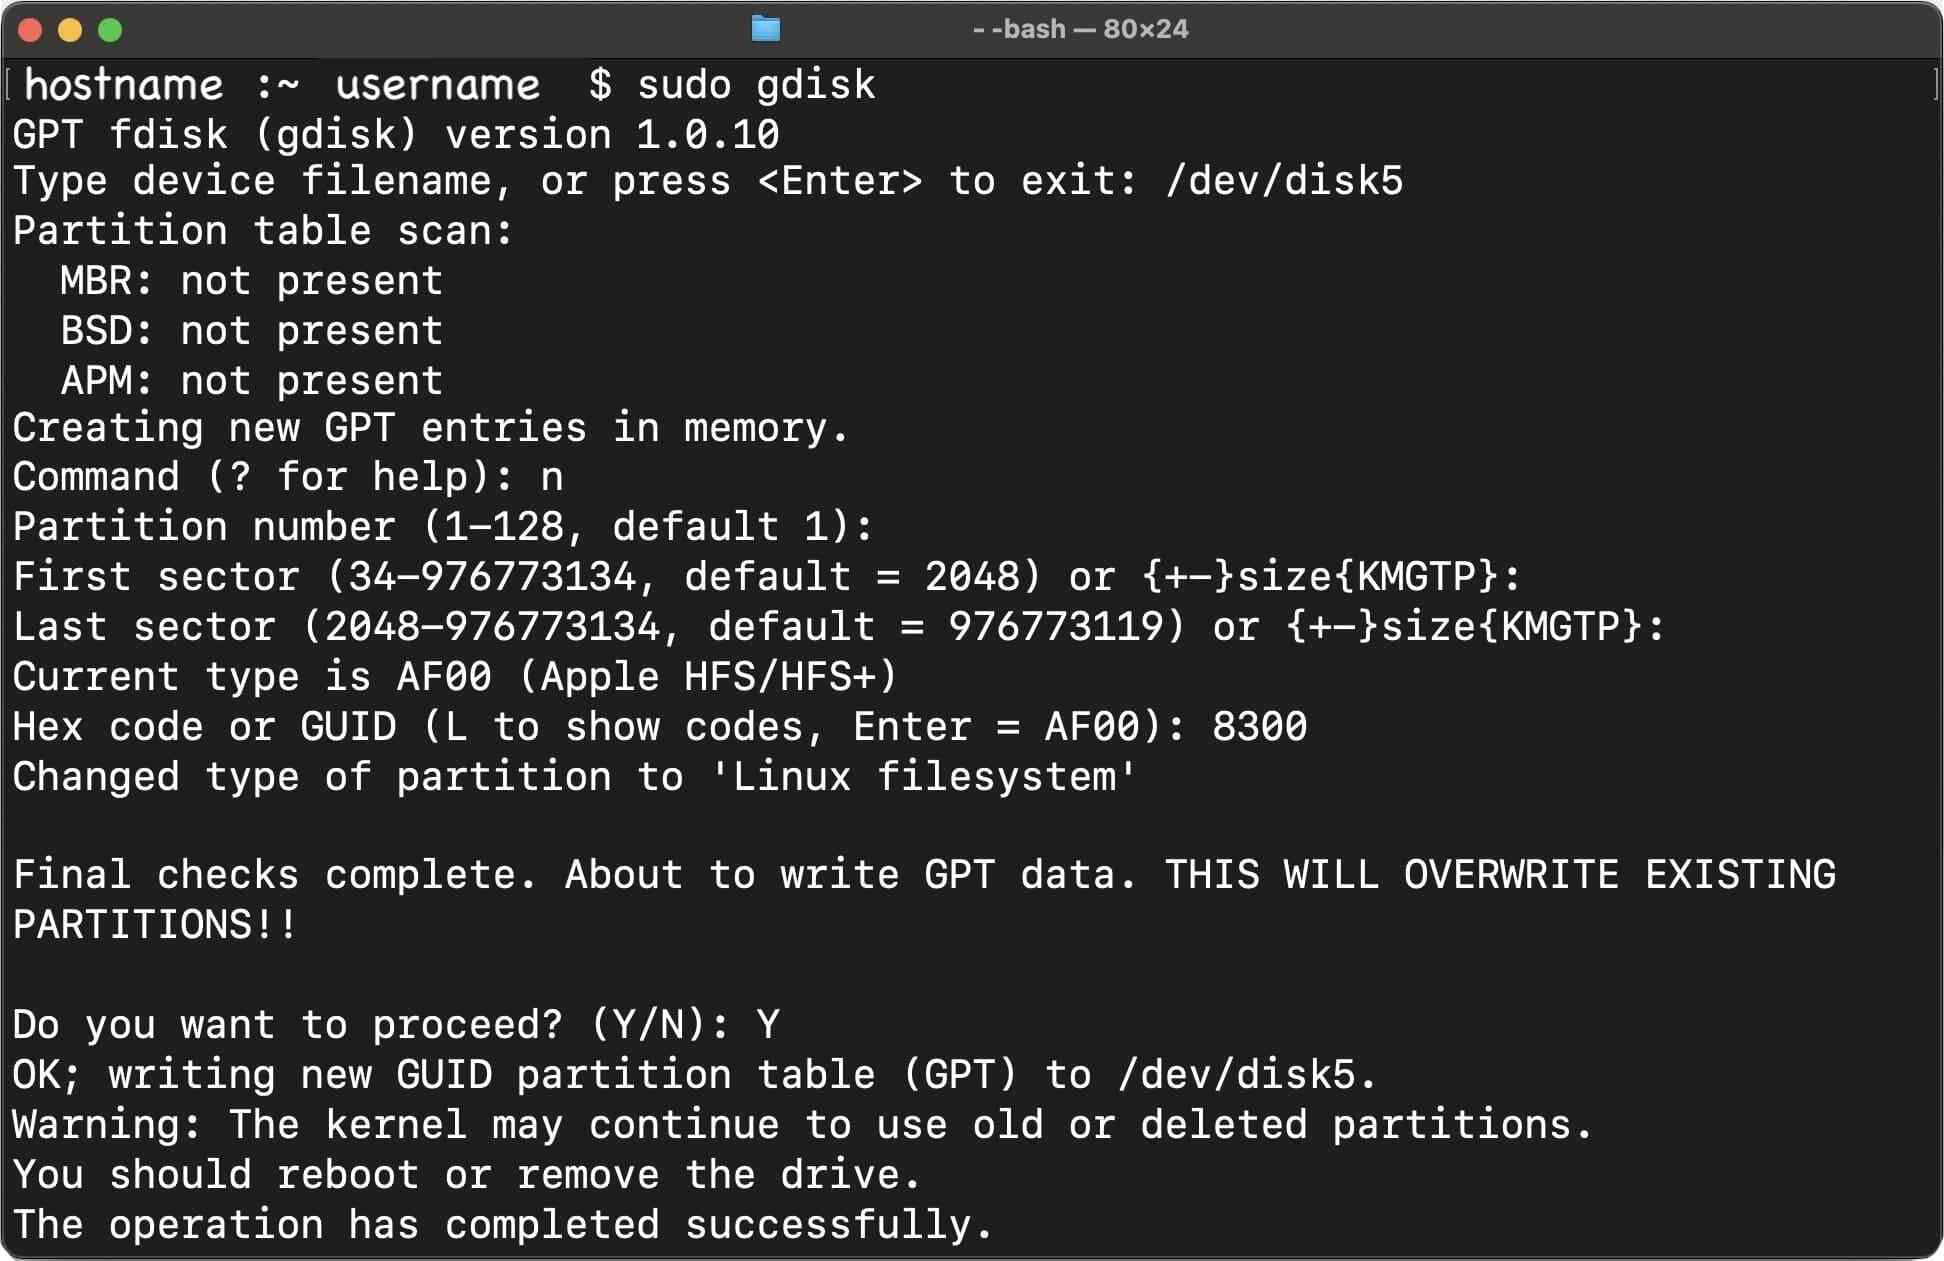
sudo gdisk. See Example Output and Troubleshoot for more information. - Enter device path found in step 7.
- Hit
n, to create a new GPT partition- If partition already exists, press
dto delete it. - if multiple partitions exist, checkout Troubleshoot section.
- If partition already exists, press
- Accept the default partition number by just pressing
return/Enter. - Accept the default starting and ending sectors (creates a partition that spans 100% of the drive) by just pressing
return/Enter - Enter
8300for the Hex-code/GUID. This is short form to select the 'Linux Filesystem' - Enter
wto write table to disk and exit tool - Hit
yto proceed, wait for it to complete, and safely eject and reinsert drive.
Example Output
After partitioning is complete. Now we can format using the e2fsprogs command.
- Download with
brew install e2fsprogs. This might take a while if Brew is not up-to-date. - Now verify disk path again with
diskutil list. - Run
sudo `brew --prefix e2fsprogs`/sbin/mkfs.ext4 /dev/diskXs1
replace the X in /dev/diskXs1 with the path found in step 18!
- Wait for it to complete and safely eject drive.
- Connect your drive to the FxBlox.
- Close FxBlox app. Now open your Fxblox app now and see your total maximum storage increase in the FxBlox app.
If the drive does not show within the next 5 minutes there maybe a variety of issues occurring. Checkout the Troubleshooting section for more details.
Windows (Free Third-Party App)
Ext4 is a linux standard that Windows does not support without some third-party help. There are various paid and free options out there, but we recommend Parition Master Free by EaseUS.
Video Guide
Written Guide
Install Partition Master Free by EaseUS if not already done
Plug in storage device to your Windows computer, if not already done
Open the app. Select
Partition Managerfrom the left sidebar- It may immediately recognize the drive and push you to use the Partition Wizard. The partition wizard is a paid service, so if you exit out of that window you can continue to use the app normally (as described below).
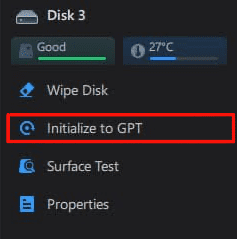
Select the new drive

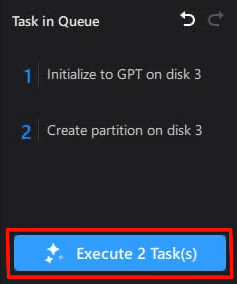
- Ensure drive partition type is listed as
GPTinstead ofMBR.- If it is not, select drive. Then, in right sidebar, select
Initialize to GPTto add it to task list queue. - Optionally, execute task.
- If it is not, select drive. Then, in right sidebar, select
Select unallocated drive, and on the right sidebar, click
Create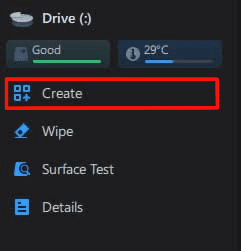
Make sure
EXT4is selected underFile system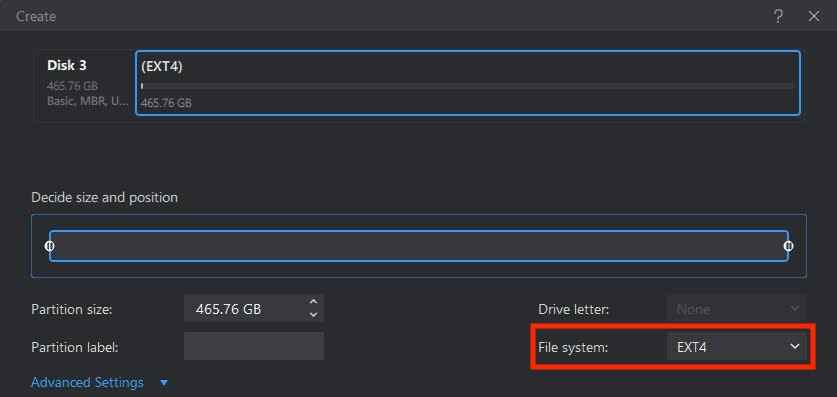
Click
OKClick
Execute # Task(s)at the bottom of the right sidebar of the main window
Wait for task(s) to complete, then close app and eject drive
Connect your drive to the FxBlox
Close FxBlox app if its currently opened, otherwise open your Fxblox app now and see your total maximum storage increase in the FxBlox app.
Troubleshoot
- Drive not recognized in Windows. If your windows computer doesn't see the connected drive, try restarting your computer first. Then look into potentially installing drivers for the storage device.
- Storage capacity not updating This could be for a variety of issues:
- Try closing/opening your app a couple of times, but also press the
retrybuttons a once or twice in between. - Restart the FxBlox by unplug-plugging it back in.
- The usb3 drive is connected to a usb2 port. On a FxBlox Lite, the top two ports are USB2.0 and the bottom is USB3.0. On a FxBlox Lite Plus, the top port is USB2.0 and the bottom two are USB3.0.
- Try closing/opening your app a couple of times, but also press the
- Additional storage devices not showing up under
DeviceTab. This is a known bug, as of app version 1.6.2. Currently, newly added storage gets added to the total instead of as a separate device. - Partition Exists already (MacOS). If a partition exists already, then you will want to delete it first, write to drive, and rerun the command:
- Get to step 9 in the Manually Partition and Format for Mac instructions
- Hit
d, to delete partition(s). - Hit
w, confirm by hittingyand saving state. - Continue Manually Partition and Format for Mac instructions, from step 7.
info
Our apps are open-source and built in React Native for cross-platform support. So if you would like to contribute to the project, that would be greatly appreciated!